 877-635-7410
 705-737-5542
3M DP290 Prefilter and Filter Change Procedure
Create an Account or Log In to see the full video.
Suretech Water Treatment Technical Support walking you through the proper procedure for changing the prefilter and filters on a 3M DP290 water filter system.
Hi, this is Suretech Water Treatment Technical Support with a video on the proper procedure for changing the prefilter and filters on a 3M DP290 system. In order to avoid a potential delay to service, it is best practice to change water filters during off-hours or non-peak times. This is the standard layout for a DP290 system, your exact systems fittings and layout may vary slightly.
To begin, we will identify our booster pump and tank. These will need to be shutdown in order to drain the pressure from the system. We will accomplish this by unplugging the booster pump, either at the adapter on top or via the main plug. We will then shut the booster tank by revolving the gate valve shut. With the booster pump system isolated, we will return to our system and begin tracing the incoming water line from the prefilter. We will identify the first available shutoff and turn it shut. This will isolate the system from incoming water during the filter change process.
With our system isolated from water pressure, we can begin our filter change. Use a small bucket or container to catch any residual water that remains within the system. We will first change our prefilter. Press the red pressure relief button on top of the bowl to relieve any remaining pressure and ensure the water is shutoff. If water persists to spout from pressure relief button, you have not isolated the system from the water supply. With the pressure out of our prefilter, we can begin to remove it with our prefilter removal tool. The bowl will remove counter clockwise. After removing the bowl, we will discard the old filter and rinse the bowl well. Prior to reinstalling our bowl, we will check the integrity of our o-ring. If stretched, damaged, or missing, replace the o-ring prior to re-assembly. We will remove the packaging from our new prefilter and insert into the bowl, aligning the bottom of the filter with the peg in the bottom of the bowl. We can then re-install our bowl by threading it on with clockwise turns. Natural instinct is to tighten as far as possible, but this may cause a leak. Best practice is to tighten the bowl all the way, and then back off the bowl about ¼ turn.
We can now change our DP290 water filters. We will open up the activation valve to relieve any pressure within the system. If your line does not run to a drain, you will have to either run a line or have a bucket handy to run water into. We can see the gauge drop to zero, indicating no water within the system. With the pressure removed from the DP290 system, we can begin removing the cartridges. Press the yellow filter latch lock and the filter will remove with a counter clockwise ¼ turn. The filter will remove downwards. Repeat with the other cartridge. We will remove our HF8-S scale inhibitor cartridge by unthreading it from the head. We can now install our new filters, beginning with the HF8-S. Be cautious while installing, the plastic threads can become misaligned and damaged if installed in the stainless steel head incorrectly. For further assistance troubleshooting your HF8-S, click the link above. We can then install our new HF90 water filters. We will align the knubs on the filter with the corresponding grooves on the head. The filter will lock into position with a quarter turn clockwise. Again, we will align the knubs on the filter with the corresponding grooves in the head. Slight upwards pressure and a quarter turn clockwise will allow the filter to lock into position.
With our new filters installed, we can begin the activation process. Return to your incoming water shutoff, and open the handle. Water will begin filling the prefilter, flowing down through our DP290 system, and out through our open activation valve. At this point we will plug back in the booster pump and reopen the booster tank. Allow the water to run and activate the filters for a minimum of 5 minutes. Following the activation process, we can shut our activation valve and allow the pressure to build within the system. We will clean and dry the area. Inspecting for any leaks that may have occurred on our prefilter or DP290 system. We can hen apply a label signifying the date of filter change and due date of the next filter change. Our DP290 system is now back in service with new filters.
This has been Suretech Water Treatment Technical Support for Suretech Water Inc. We are a fully approved filter supplier in the food service industry, and we’re here to help. For sales, service, or assistance with your water system, please contact our team today at 1-877-635-7410 or via or website at www.suretechwater.ca
MUSIC: bensound.com
Newest Videos
 Everpure MRS 600HE II Filter Change Procedure
A video from Suretech Water Treatment Technical Support on the proper procedure for changing filters in an Everpure MRS-600 HEII Reverse Osmosis System.
View More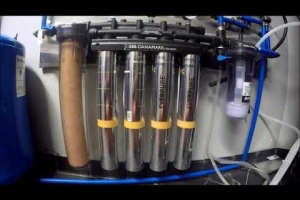 Everpure Quad Manifold Filter Change Procedure (Ciniplex)
A video from Suretech Water Treatment Technical Support on the proper procedure for changing filters in an Everpure Quad Manifold (4-can manifold).
View More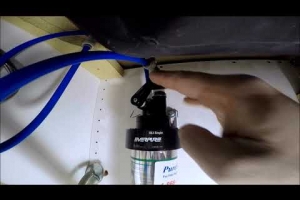 QL3 Single Head Filter Change Procedure
A video from Suretech Water Treatment Technical Support with a video on thee proper procedure for changing filters in an Everpure single head.
View More