 877-635-7410
 705-737-5542
Changing The Membranes And Filters In A 3M SGLP2 BL Reverse Osmosis
Create an Account or Log In to see the full video.
Hi, this is Suretech Water Treatment Technical Support with a video on the proper procedure for changing the filters in your 3M SGLP2-BL reverse osmosis system.
It is best practice to change the filters during off-hours or non-peak times to avoid a potential delay to service.
To begin, we will follow our blended product line out from the back left port of the system and shut the outlet to the applicable equipment.
We will then shut the small internal tank on the reverse osmosis by turning the shutoff valve on top of the system.
We will find the shutoff to the large external tank either by following the line up from the tank, or down from the second port on the right side of the system. Here we followed the line up from the external tank. Be careful when identifying the tank shutoff. Here we have a shutoff leading a drain port, but this will not shut the tank off from the system. We will continue to follow the line and find the shutoff that isolates the tank from the system.
Once identified, we will shut this during the filter change process.
We will then look to identify our flush port. We will follow the same line as our blended product, the back left port of the system.
Following the line, we will identify the first available shutoff port that is accessible. We will attach a flush line and run it to the drain. Alternatively, you can run the water from the port into buckets.
We will open the port now, allowing water to run through the line to the drain. Alternatively, if using buckets, wait until shutting off the water in the next step before you open the flush port.
The reverse osmosis is fed from what is known as a water distribution manifold. We can follow the line from our pop system up to the water distribution manifold feeding the reverse osmosis system.
We will turn and shut this handle, isolating the reverse osmosis system from the incoming water source.
The gauge on top of the system dropping to zero indicates we have properly removed the water pressure from within the system.
If due, we will begin with our membrane cartridges. These can be removed from the system with a counter clockwise quarter turn and light downwards pressure. The membranes are attached to the reverse osmosis via reject lines. These can be removed by depressing the collett at the base of the line and light pressure on the line.
Again, we will depress the collett holding the line, and using light pressure pull the line out of the old membrane cartridge.
Our new membranes will install in the reverse order. First, we will insert the reject lines into the membrane collets. Slight inwards pressure will lock the line in position. A tug on the line will confirm it has been properly seated in the collett. The membrane will then install upwards, aligning the grooves with the gaps in the membrane head followed by a quarter turn clockwise. With our new membranes installed, we will apply water to the system to begin the flush process on our membranes.
We will return to the water distribution manifold and open our port to the reverse osmosis. This will allow water to flow to the system, through our new membranes and out through our open flush line.
We will allow the membranes to flush for a minimum of 10 minutes.
Following our membrane installation, we can again stop the water to our system via the water distribution manifold.
Once again, prior to removing the filter, we can confirm the absence of water pressure in the system by the gauge on top of the system reading zero.
We can then remove our polishing filter by turning the filter cartridge a quarter turn counter clockwise. The filter will remove downwards. There are multiple options for replacement polishing filters. Sizing largely depends on your particular stores local water quality and volume of usage.
Our new filter cartridge will install by aligning the knubs on the filter with the corresponding grooves in the head. Slight upwards pressure and a clockwise quarter turn will lock the filter in position.
We can then return to our water distribution manifold and once again, open our reverse osmosis port, applying water to the system.
We will allow the water to enter our reverse osmosis, flush through our filter, and out to the drain via our flush line.
Allow the water to run and flush the cartridge for a minimum of 5 minutes
Following the activation process, we can return to our flush line and shut the port. We will return to and open the small internal tank by opening the valve on top of the system. We will return to our external tank shutoff we had previously closed, and reopen it. And finally, we will return to and open our outlet to our equipment.
This has been Suretech Water Treatment Technical Support for Suretech Water Treatment Inc. For replacement filters, systems, service, or assistance with your water filtration system, contact us today at 1-877-635-7410 or via our website at www.suretechwater.ca
Music: bensound.com
Newest Videos
 Everpure MRS 600HE II Filter Change Procedure
A video from Suretech Water Treatment Technical Support on the proper procedure for changing filters in an Everpure MRS-600 HEII Reverse Osmosis System.
View More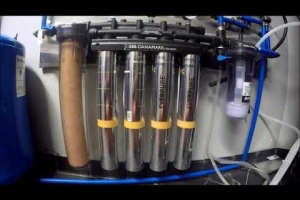 Everpure Quad Manifold Filter Change Procedure (Ciniplex)
A video from Suretech Water Treatment Technical Support on the proper procedure for changing filters in an Everpure Quad Manifold (4-can manifold).
View More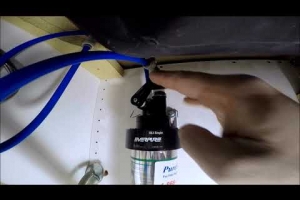 QL3 Single Head Filter Change Procedure
A video from Suretech Water Treatment Technical Support with a video on thee proper procedure for changing filters in an Everpure single head.
View More